I haven’t made the cinnamon pull apart bread yet. Somehow, I managed to not be distracted by my kitchen this weekend (I had delicious chilaquiles here instead!). Here I am on a rainy Tuesday, trying to formulate a research question while making butterscotch brownies. This recipe came from my mother, who has been inspiring me with her gardening and kitchen skills for three decades already. Enjoy!

Butterscotch Brownies 

*This recipe is intended for an 8 x 8 pan. I  a) don’t have one and b) am greedy with these brownies so I’ve doubled it for double the deliciousness. Its up to you….

Preheat oven to 350 degrees.

Measure and set aside:
1 1/2 cup flour
1 tsp baking powder
1/2 tsp salt
In a saucepan:
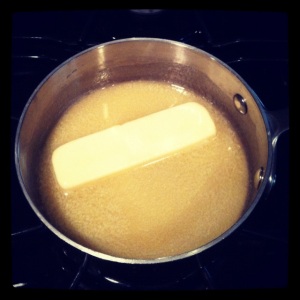
Melt 1/4 cup butter

Mmmm melting butter.

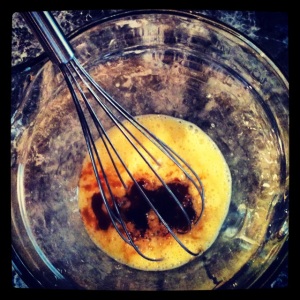
While your butter is melting, whisk 1 egg and 1 tsp of vanilla in a separate bowl.

Egg + Vanilla

Stir 1 cup of brown sugar into melted butter until dissolved. Allow to cool slightly, then mix into egg + vanilla mixture. Combine thoroughly with dry ingredients.

Press walnuts into brownie mixture…

Bake for 15-20 minutes or until done through. Be careful not to burn or overcook them – you want these butterscotch brownies to be chewy.

I’m supposed to be writing I will  am write writing a thesis this year. It will be the culmination of a three year dual masters program that I’m looking forward to finishing come June 2013. We’re on a quarter system, and just finished week 5 out of the 10 week quarter. That means, I have 5 weeks remaining to write a thesis prospectus that me and my committee feel good about, while working full time and going to class until 10pm three nights a week. It’s exciting, terrifying, and exhausting all at once. I’m almost surprised to find myself standing and able to make it out of the house to work once Friday rolls around.

The most challenging thing about my crazy schedule is finding the time to go to the gym and cook proper meals. I love to make dinner – I find it sort of meditative. The second most challenging this is my serious problem with procrastination. Last weekend I wasted away making this amazing pull apart pumpkin bread (I had to skip the glaze – the bread was a bit too sweet for me as it was) and this array of roasted gems. Keeping with the pull apart theme, I plan to give this one a try this weekend. I’ll let you know how it goes.

If you finished all your roasted vegetables and you just don’t know what to make next because the rain has washed away all of your brilliant and delicious plans: make a spaghetti squash and top it with a simple marinara. If you’re worried it won’t be substantive enough, add some lentils to your sauce. Somehow, I managed to go through more than two thirds of my life without understanding the wonder that is spaghetti squash. If you don’t love it already, it’s only a matter of time…

Roasted Spaghetti Squash with Marinara

  • 1 spaghetti squash
  • 1 onion, diced
  • 4 cloves garlic, minced
  • 1 t oregano
  • 1 T basil
  • 2 T olive oil
  • Roughly 2 cups diced tomatoes
  • 2 T tomato paste
  • 1/4 cup lentils (optional)
  • Salt + Pepper to taste

Preheat your oven to 400 degrees. Put your squash into the oven whole. Allow it to roast for about 30 minutes or until it feels tender. While your squash is roasting, prepare the sauce. Saute the onion in the olive oil until its translucent. Add the garlic, oregano and basil. Saute another couple of minutes. Add the tomato paste and diced tomatoes. Allow the sauce to simmer. Add salt, pepper and other spices to taste. I’m really informal about tomato sauce – sometimes I add balsamic vinegar or red wine, sometimes chili flakes for a spicy sauce, sometimes a little agave if the tomatoes aren’t sweet. Occasionally a touch of cinnamon. I like to keep it really simple for the spaghetti squash though – its so sweet and hearty on its own, a fresh tasting sauce really balances it out.

If you’re planning to add the lentils, precook them a bit first and then add them to the sauce.

Remove your squash from the oven with hot pads or oven mitts. It should give a little when you pick it up. Cut off the stem end, and then slice it in half. Gently remove the seeds with a fork. Once you’ve removed the seeds use the fork to separate the strands of squash from the skin. I find it helpful to scoop them into a bowl as I go. Toss the strands with a little olive oil and pepper. Serve as you would spaghetti topped with marinara!

Sorry for the lack of photos. What I will share with you is this: tomato paste in a tube! Brilliant, Trader Joe’s. Brilliant!

Image

Its been raining at least once a day for the past two weeks, I’ve packed away my sandals and busted out my collection of opaque tights and have traded the glory of fresh tomatoes for apples and pumpkin everything. Fall has arrived.

Image

I love fall vegetables, almost as much as I love summer produce. Almost. I love the saturated colors and the caramelized sweetness you get when you roast them. This particular round of roasted veggies was inspired by a gorgeous romanesco cauliflower I found at the market. A perfect match to the beets, sweet potatoes and parsnips hanging out in my veggie drawer.

Image

I roasted each vegetable separately; tossing them first in olive oil, truffle salt, and freshly ground pepper before putting them into a 425 degree oven. I go to the trouble of cooking them separately because like my cauliflower to have a little crunch to it and my beets to keep their color to themselves, but you certainly could combine them all and add the cauliflower for the last 15 minutes or so. The result was a lovely rainbow of roasted vegetables…

Image

I have a lot of studying to do today. As a result, I’ve made these cookies, scrubbed the floors and the cupboards, done two loads of laundry and all the dishes, and am about to paint a closet, weed in the backyard and go out on a boat. Before I continue with my epic sunday of procrastination, I need to share this recipe; mostly as a service to myself given that its already ALL. OVER. THE. INTERNET.

This recipe came from the New York Times in 2008 and has been bouncing around since. I read about them last week on Emily’s blog, and Emily heard about them from Kate, who had them when she stayed at her friend Shirley’s house and remembered them years later. I didn’t really need to make cookies today. I made some cookies last week, but I had some cake flour lying around and needed to see for myself what all the fuss was about. These cookies are worth all that fuss.

You will need the following ingredients plus some patience – the dough has to be refrigerated for at least 24 hours for maximum success:

  • 2 cups minus 2 tablespoons (8 1/2 ounces) cake flour
  • 1 2/3 cups (8 1/2 ounces) bread flour (*I didn’t have bread flour and used all purpose and think these came out amazing anyway)
  • 1 1/4 teaspoons baking soda
  • 1 1/2 teaspoons baking powder
  • 1 1/2 teaspoons coarse salt
  • 2 1/2 sticks (1 1/4 cups) unsalted butter
  • 1 1/4 cups (10 ounces) light brown sugar
  • 1 cup plus 2 tablespoons (8 ounces) granulated sugar
  • 2 large eggs
  • 2 teaspoons vanilla extract
  • 1 1/4 pounds bittersweet chocolate chips (at least 60% cacao)
  • Sea salt

1. Sift flours, baking soda, baking powder and salt into a bowl. Set aside.

2. Cream butter and sugars together until very light, about 5 minutes. Add eggs, one at a time, mixing well after each addition. Stir in the vanilla. Reduce speed to low, add dry ingredients and mix until just combined, 5 to 10 seconds. Add chocolate chips.

3. Wrap well with plastic wrap and refrigerate for 24 to 36 hours. Dough may be used in batches, and can be refrigerated for up to 72 hours.

3. When ready to bake, preheat oven to 350 degrees. Line a baking sheet with parchment paper or a silpat. Set aside.

4. Scoop balls of dough roughly the size of a golf ball onto baking sheet (in the original recipe 3 1/2 ounce mounds are called for, others have success with an ice cream  scoop. I just made larger-than-usual balls of dough about the size of a golfball. The trick is to not make small cookies – thats how you get the chewy center and crispy edges).

5. Sprinkle lightly with sea salt and bake until golden brown but still soft, about 15 minutes. Allow to rest for about 10 minutes before transferring to a wire rack. Enjoy!

It’s funny that out of the handful of recipes I have on this blog, this is my second post about fish, because I’ve only cooked fish three times in my lifetime.

I had my parents over to our house last week for dinner and I wanted to make something easy, simple and delicious. Halibut is in season, and I always love fennel and orange. Usually in a beet salad, but for some reason I got this idea in my head of halibut, fennel and orange in parchment packets and I couldn’t shake it. Thus, a dinner menu was born. I served this with basmati rice and steamed bok choy. For dessert, we had amazing roasted rhubarb over vanilla ice cream. I am still dreaming of that rhubarb – if only the stalks would grow back overnight…

Image


You’ll need:

  • Fresh halibut for 4, divided into 4 pieces
  • 1 fennel bulb + fronds
  • 1/4 cup parsley
  • 1 orange
  • Butter
  • Salt + Pepper
  • 4 sheets parchment

Slice the fennel, roughly chop your parsley, and supreme the orange and set aside so you are ready to assemble. Keep the membranes from your orange, you’ll use their juice. Preheat your oven to 400 degrees.

On your first sheet of parchment, lay out a bed of fennel and place a piece of fish on top. Top with a pat of butter, and salt and pepper. Then assemble 1/4 of the orange slices, more of the fennel, parsley and fennel fronds on top. Squeeze a bit of the orange juice over the fish, and seal the parchment packet by folding the edges together. You’ll want the seam facing up while the fish is baking so the juices do not escape. Repeat for each piece of fish, and place your four packets on a baking sheet. Bake for 12-14 minutes.

I just ate the most amazing salad – full of fresh corn, blueberries, basil and quinoa. Although I usually enjoy the result, I tend to cringe at the idea of putting delicious summer fruits into savory things. I’ll throw an apple into anything – but I’m a purist when it comes to farm fresh nectarines, peaches, apricots and berries. I made an exception for blueberries last night while concocting a quinoa salad to bring for my lunch – and the result was divine. Crunchy  corn and sweet blueberries, paired with a mild balsamic and olive oil dressing, laced with just picked basil and tossed with wholesome quinoa. So good.

To create:

  1. two ears of summer corn – cooked lightly (boil water, add corn, cook 5 minutes and drain) after your corn has cooled, cut from the cob
  2. one pint blueberries, washed
  3. 1 cup quinoa, rinsed (boil quinoa in 1 1/2 cups water, cover, reduce heat and simmer for 15 minutes. set aside)
  4. small bunch of basil, washed and chopped
  5. olive oil, sea salt, balsamic vinegar combined to make about 1 cup of dressing
  6. in a bowl, combine corn, blueberries and basil. toss with dressing. add cooked quinoa. enjoy!

There is an adorable cafe in my neighborhood with the most amazing brown butter blondies. A perfect Saturday involves coffee in bed with my sweet, a yoga class finished with a Mary Oliver poem during our final savasana, and a long meandering walk to Volunteer Park Cafe with a dear friend. As the ritual goes, we sit outside (sunshine permitting), sipping iced coffee, splitting an entree, and topping it off with a brown butter blondie, and a chocolate chip/oatmeal/cherry cookie. Divine. Last Saturday I was really craving a blondie, and totally out of luck. They were absent from the pastry case! Determined to re-create them at home, I searched the internet for a recipe that might just produce the amazing results I was hoping for, and settled on a recipe from Blue Ridge Baker.

blondies

  • 1/2 cup butter, browned
  • 1 cup brown sugar
  • 1 egg
  • 1 t vanilla
  • 1/2 t baking powder
  • 1/8 t baking soda
  • 1/2 t salt
  • 1 cup flour

Preheat oven to 350. Butter and lightly flour an 8×8 pan. In a medium sized bowl, whisk together the brown butter and sugar. Add the egg and vanilla and whisk until well combined. Add flour, baking powder, baking soda and salt and mix. Pour into prepared pan and spread evenly. Bake for 20-25 minutes, or until a tester comes out clean. Cool in pan on rack. Enjoy!

Lying in bed Sunday morning, I nursed my too-many-whiskey-gingers induced hangover with three pints of water, a french press of stumptown and an hour long phone call with mi mejor amiga in New York. She was telling me about her Saturday night, which involved friends, beer, and a karaoke birthday party complete with the most delicious banana cupcakes she had ever had in her life. Banana cupcakes? Of course! Why have I never attempted these at home?!

I did a little sneaking around the internet and found this recipe on Martha Stewart dot com. Honey cinnamon icing does sound interesting, but I think vanilla buttercream sounds a little bit better with banana cake. I’m curious to see if banana cupcakes are no different from banana bread? Perhaps a little lighter and sweeter? As soon as the bananas on my counter turn from canary yellow to soft and spotted, I’ll give it a go and report back!

the recipe

  • 1 1/2 cups all-purpose flour (spooned and leveled)
  • 3/4 cup sugar
  • 1 teaspoon baking powder
  • 1/2 teaspoon baking soda
  • 1/4 teaspoon salt
  • 1/2 cup (1 stick) unsalted butter, melted
  • 1 1/2 cups mashed bananas (about 4 ripe bananas)
  • 2 large eggs
  • 1/2 teaspoon pure vanilla extract

directions

  1. Preheat oven to 350 degrees. Line a 12-cup muffin pan with paper liners. In a medium bowl, whisk together flour, sugar, baking powder, baking soda, and salt.
  2. Make a well in center of flour mixture. In well, mix together butter, mashed bananas, eggs, and vanilla. Stir to incorporate flour mixture taking care not to overmix. Spoon batter into muffin cups.
  3. Bake until a toothpick inserted in center of a cupcake comes out clean, 25 to 30 minutes. Remove cupcakes from pan; cool completely on a wire rack. Frost generously.

Applying for grad school sucked up so much of my time and energy that I seemed to have settled into a rut eating out while I am at work, and giving in to sugary sweets in the afternoon. Gross. Now that the process is almost completely behind me, I’m committing to getting back on the wagon – making salads to bring for my lunches, going to yoga several times a week, and running (a lot or a little). Summer is on the horizon, and there is no room for winter layers in my wardrobe.

This amazing salad is based on the Emerald City Salad from the PCC deli ( a co-op in the Seattle area). I used to work near a PCC and eat it several times a week for lunch. I quickly learned that it was much more affordable to make it myself…

You will need:

Kale
Chard (I like to use rainbow)
Parsley
A fennel bulb
Red Bell Pepper
Yellow Bell Pepper
About 1 C wild rice

Olive Oil
Minced Garlic
Lemon juice
Salt and Pepper

To Assemble:

Bring 2 C. water to a boil and add the wild rice. Bring to a boil again, lower the heat, cover, and allow to simmer for about an hour or until all of the water has been absorbed.

Finely chop the kale, parsley and chard into a large bowl. Chop the peppers and fennel and set aside.

Make a dressing using the minced garlic, olive oil, and lemon juice.

I like to allow my rice to cool a bit, but not completely so that it wilts the greens a tiny bit. Then add the peppers, fennel and dress. Add salt, pepper and more lemon juice if necessary to taste.

Until Monday, when we were graced with fleeting snow flurries, Seattle was experiencing some lovely Spring weather. Sunny, with highs of 60 degrees and cherry blossoms in full bloom. 

Saturday morning was no exception, and I celebrated the perfect Spring weather over an outdoor brunch with friends at Volunteer Park Cafe. Stumptown coffee, delicious baked goods, sunny sidewalk tables and friendly servers = cafe perfection.

The three of us shared the caramelized banana brioche french toast, brie, apple & lavender honey panini and the spinach & goat cheese quiche. All three were divine – the quiche coming in last because the thin, too crispy crust was difficult to eat, and left something to be desired. The atmosphere was perfect for sitting on the sidewalk, sipping iced americanos and chatting. Had there not been a line,  I could have sat their all day enjoying the sunshine and atmosphere. I am amazed I’ve been living in Seattle for almost ten years and have just now discovered this gem.

Enter your email address to follow this blog and receive notifications of new posts by email.